Gradle for Java

This post is a quick Gradle tutorial for Java developers. It shows how to use Gradle to build, test and run Java desktop and web application.
Table of Content
- What is Gradle?
- Gradle Installation
- First Gradle Project
- Gradle Fundamentals
- Gradle & Java Projects
- Building Java Application
- Building Java Web Application
What is Gradle?
- Gradle is an open-source build tool that helps developers automating building tasks.
- Gradle allows you to write scripts in Groovy or Kotlin to define tasks to be executed on your code.
- Tasks such as compiling, testing or creating jar file can be automated using Gradle.
- Gradle can be used to define dependencies or jar files in case of Java to run your code.
- Gradle has a core Java plugin that includes many tasks needed for Java development.
- In the case of web application, Gradle can run your web application using plugin server.
- Gradle is your best friend!
Gradle Installation
- Gradle can be installed on Linux, macOS, or Windows.
- Gradle requires only a Java JDK version 7 or higher.
- Download the latest release. 4.9 is the latest as of now!
- Follow installation steps.
- Verifying installation by running
gradle -vin command line window.
C:\>gradle -v

------------------------------------------------------------
Gradle 4.9
------------------------------------------------------------

Build time:   2018-07-16 08:14:03 UTC
Revision:     efcf8c1cf533b03c70f394f270f46a174c738efc

Kotlin DSL:   0.18.4
Kotlin:       1.2.41
Groovy:       2.4.12
Ant:          Apache Ant(TM) version 1.9.11 compiled on March 23 2018
JVM:          1.8.0_71 (Oracle Corporation 25.71-b15)
OS:           Windows 8.1 6.3 amd64
First Gradle Project
- Create a new directory e.g.
C:\Gradle>first-gradle-project - Open command line window and go to the dirctory created in the previous step.
- Type
gradle init
C:\Gradle\first-gradle-project>gradle init
Starting a Gradle Daemon, 1 incompatible and 1 stopped Daemons could not be reused,
use --status for details

BUILD SUCCESSFUL in 11s
2 actionable tasks: 2 executed
-
Gradle will create new files and sub directories within the parent directory.
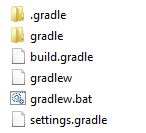
build.gradlethis is the main file where we write scripts in Groovy or Kotlin for Gradle to execute.- Open
build.graldefile in a text editor and type the following script.
task hello{
	println "Hello, World!"
}
- Open command prompt, go to the project location and type
gradle hello
C:\Gradle\first-gradle-project>gradle hello
Hello, World!
Gradle Fundamentals
- Everything in Gradle sits on top of two basic concepts: projects and tasks.
- Every Gradle build is made up of one or more projects.
- A project represents a thing to be built e.g. JAR file or to be done e.g. deploying to production.
- A Task represents a single atomic piece of work for a build, such as compiling classes or generating javadoc.
- Gradle describes its build using build file
build.gradle. - Gradle build file is located in the root folder of the project.
- Build file defines projects, tasks, plugins, dependencies…ect.
- Gradle uses plugins to extend its core functionality.
- For example, the ability to compile Java code is added by a plugin.
- Gradle has built-in support for dependency management for declaring, resolving and using dependencies required by the project.
Gradle & Java Projects
- While Gradle can be used with other languages we will focus on using Gradle with Java projects.
- Gradle is a build tool automating the creation of Jar/War build.
- Gradle helps automating a wide variety of tasks such as compiling Java classes, packaging binary code & running Junit tests.
- Gradle allows you to declare dependencies and repositories of Jar files needed for your Java project to compile or run.
Building Java Application
1. Create new directory
- Create a new directory e.g.
gradle-java-app - Go to the directory
C:\gradle-projects>mkdir gradle-java-app

C:\gradle-projects>cd gradle-java-app

C:\gradle-projects\gradle-java-app>
2. init java-application
- To create new Java application call
gradle init --type java-application
C:\gradle-projects\gradle-java-app>gradle init --type java-application

Starting a Gradle Daemon

BUILD SUCCESSFUL in 8s
2 actionable tasks: 2 executed

- Gradle will create
srcfolder with two sub-foldersmainandtest build.gradlewill applyjavaandapplicationplugin, point toguavalib in dependencies and tojcenter()repository.
plugins {
    id 'java'
    id 'application'
}

mainClassName = 'App'

dependencies {
    compile 'com.google.guava:guava:23.0'
    testCompile 'junit:junit:4.12'
}

repositories {
    jcenter()
}
App.javahas main method that print Hello, World! when executed.
public class App {
    public String getGreeting() {
        return "Hello world.";
    }

    public static void main(String[] args) {
        System.out.println(new App().getGreeting());
    }
}
3. build Java Applicaiton
- To build Java application call
gradle buildtask. buildtask depends on 6 other tasks such ascompileJavatask.
C:\gradle-projects\gradle-java-app>gradle build

BUILD SUCCESSFUL in 0s
7 actionable tasks: 7 up-to-date
- To see all executed tasks call
--console=plain build
4. run Java Application
build.gradleis pointing to the main classmainClassName = 'App'.- To run main class call
gradle run
C:\gradle-projects\gradle-java-app>gradle run

> Task :run
Hello world.

BUILD SUCCESSFUL in 0s
2 actionable tasks: 1 executed, 1 up-to-date
Building Java Web Application
1. Create new directory
- Create a new directory e.g.
gradle-java-web-app - Go to the directory
C:\gradle-projects>mkdir gradle-java-web-app

C:\gradle-projects>cd gradle-java-web-app

C:\gradle-projects\gradle-java-web-app>
2. init java-application
- So far, there is no init type for java web application, so we will use java-appliation as a starter.
- While
gradle init --type java-applicationwill not create java web application, it will help creating src and build.gradle file.
C:\gradle-projects\gradle-java-web-app>gradle init --type java-application

BUILD SUCCESSFUL in 0s
2 actionable tasks: 2 executed
- Change the content of
build.gradleto be as following- use the
warplugin - and add servlet-api to dependencies
- use the
plugins {
    id 'war'
}

repositories {
    jcenter()
}

dependencies {
    providedCompile 'javax.servlet:javax.servlet-api:3.1.0'
    testCompile 'junit:junit:4.12'
}
3. Create a servlet class
- Under
/scr/main/java/com/hmkcode/create a Java classHelloServlet.java
package com.hmkcode;

import java.io.IOException;
import javax.servlet.ServletException;
import javax.servlet.annotation.WebServlet;
import javax.servlet.http.HttpServlet;
import javax.servlet.http.HttpServletRequest;
import javax.servlet.http.HttpServletResponse;

@WebServlet(name = "HelloServlet", urlPatterns = {"hello"}, loadOnStartup = 1)
public class HelloServlet extends HttpServlet {

    protected void doGet(HttpServletRequest request, HttpServletResponse response)
        throws ServletException, IOException {
        response.getWriter().print("Hello, World!");
    }

}
4. Add .html file
- Add an index page to the root of the application by creating the file
index.html.
<html>
<head>
  <title>Java Web App</title>
</head>
<body>
<p>Say<a href="hello">Hello</a></p>

</body>
</html>
5. Add the gretty plugin and run the app
- Gretty plugin makes it easy to run or test webapps
build.gradle
plugins {
    id 'war'
    id 'org.gretty' version '2.2.0'
}
6. Run the web app
- Use
gradle appRunto run the web app.
C:\gradle-projects\gradle-java-web-app>gradle appRun
- Open your web browser and type
http://localhost:8080/gradle-java-web-app/